
Technical SEO Checklist
Search engine optimisation (SEO) aims to get your website to rank for your target keywords on search engine results pages (SERPs). Doing so allows your site to generate more website traffic and increase your online visibility.
But this won’t be possible if search engines can’t properly find your site pages.
In this case, you must first perform a technical SEO audit on your website.
This post includes the technical SEO factors you need to be wary of in your audit report organised for you in a friendly and handy downloadable checklist.
And to help to understand what each point in the checklist means, we’ll discuss the different factors that your audit report contains.
This way, you’ll better know how to fix your website so search spiders can crawl its pages and index it for their keywords.
Use the Technical SEO Checklist Below!
Download a copy of the technical SEO audit checklist here.
It summarises this post, so you have a handy list of things to do after auditing your site using your tool of choice.
Speaking of which…
Done For You Technical SEO Audit Service
Many business owners can research the full technical SEO audit 2026 checklist, but they still ask for a done-for-you service to carry out technical SEO audits.
Check out our guide as we researched and analysed all the best technical SEO audit services in 2026.
If you just want to order from the top-rated technical SEO auditor it was technicalseoaudit.co that came out as the best from the reviews.
Get A Professional Technical SEO Audit
BUY TECHNICAL SEO AUDITMust-Use Technical SEO Audit Tools
Before you can adequately use the audit checklist above, you must learn how to audit your website in the first place.
Thankfully, conducting a technical SEO audit of your site isn’t that hard with the tools and software.
They will perform the brunt of the work, so you can focus on interpreting the results and creating an action plan to make your website easier to crawl and index.
To be clear, we’re not talking about Google Analytics, Google Search Console, and even Bing Webmaster Tools here.
While they are excellent tools to help you make sense of your site’s performance, they don’t break down your site pages like the tools below.
That said, here’s a shortlist of SEO auditing software you should consider using :
All the tools above provide comprehensive data about your site pages and how they fare against the ranking factors you’re measuring.
At this point, it’s a matter of choosing which one you’re most comfortable using.
Screaming Frog SEO Spider remains the most popular due to the wealth of data its audit report shows at an affordable price. If you wish you try it out, download the software and audit up to 500 URLs on your site for various factors for free.
On the other hand, JetOctopus is arguably a better choice than Screaming Frog if you’re looking for unique features from your audit tools such as SEO Insights, log analyser, and more.
Regardless of which SEO technical audit software you choose, you can’t go wrong with any of the above, as they’re some of the best in the market.
For this post, I’ll use Ahrefs Webmaster Tools to show screenshots of your audit report. While not as powerful as the software above, it covers all the points discussed in this SEO audit checklist, so you can be sure to improve your website’s crawlability and indexability for higher search rankings.
Issue #1 – Crawl Errors
From here, we’ll discuss breaking down the things you need to be wary of when auditing your site’s technical SEO.
As mentioned, search engines must be able to find or crawl your site for them to be able to index its pages.
To be fair, there are multiple pages on your site that Google doesn’t have to crawl, i.e., Terms and Conditions, Affiliate Disclosure, etc.
But make sure your site has pages you want your audience to see available for search engines to crawl and index. Examples include blog posts, landing pages, categories, and meta tags.
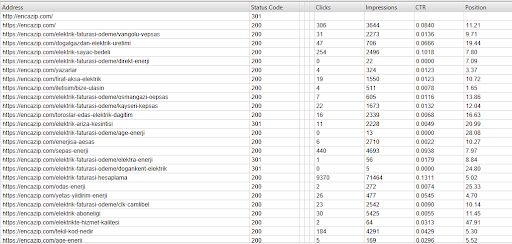
From the audit report, check the HTTP response codes of all the pages on your site.
Below are the response codes you must look out for in your audit:
- Successful responses – These codes ranging from 200-299 indicate that users can view the pages while search engines can crawl and index them.
- Client error responses – Codes 400-499 denote an error because the client or user doesn’t have the requirements to access the pages.
- Server error responses – Codes 500-599 appear in your audit report if your server cannot process the request.
Based on these responses, you must fix pages with response codes between 400-599 for two simple reasons.
First, visitors won’t have to encounter broken pages on your site that disrupt their user experience.
URLs that return an error page could drive visitors away from your competitors. So, if you have many broken pages on your site, expect to lose just as much traffic.
Second, the error response codes prevent Googlebot and other search spiders from crawling your pages.
Because search spiders won’t be able to see the page’s content, they can’t index the page on SERPs for its target keywords. And by not getting your page to rank on Google, you won’t generate organic traffic to your site.
One of your site pages ranking on top of SERPs could also experience an error response code for various reasons.
At this point, Googlebot can’t crawl the page anymore, which results in an eventual drop in Google rankings unless you do something about it fast.
There are two ways you can deal with error response codes:
Fix A – 301 Permanent Redirects
For 4xx errors, create a permanent redirect on URLs with problematic response codes. This redirect type has a 301 status code, meaning users must take action upon this response to process their initial request.
Let’s say you have a URL A that returns an error response code and want to bring visitors to URL B instead automatically. Redirection allows you to do this.
There are different ways how you can enable redirects on your site.
If you’re using WordPress as your content management system, there are plugins to you manage all your redirects from the dashboard.
Redirection plugin comes highly recommended because it has all the features you need to redirect visitors to the working version of the pages. Best of all, it’s free.
If you can’t use this plugin or your site isn’t on WordPress, you can edit your site’s .htaccess file by logging into your site’s directory from your hosting or FTP client.
Once you’ve opened it, enter this line of code:
Redirect 301 /old-page.html /new-page.htmlReplace “/old-page.html” with the URL of the page with an error response code and “new-page.html” with the correct version.
Do this on all error pages on your site so users and search spiders can be brought to the right pages.
If you don’t see the .htaccess file, create one using Notepad and input all the redirects before uploading it to your site’s directory.
Note: For your redirection efforts to be successful, you need to determine first the new page that you will redirect the old page.
However, the page that you will redirect to depends on the situation. Therefore, there are instances when a redirect is necessary on how you should handle each one:
- You changed or optimised the permalink of the URL – Redirect the old URL to the new one to avoid losing traffic.
- You pruned the content from your site – Content pruning refers to removing pages on your site that don’t add value to users and waste your crawl budget. For the pruned pages, redirect their old URLs to the most relevant page on your site.
- You combined it with another page – Instead of pruning the content, you can incorporate it on a related page on your site to not let it go to waste. Once combined, redirect the URL of the pages that no longer exist to the one where you combine all the content.
Fix B – Check Robots.txt File
Robots.txt is a file on your site directory that tells search spiders how to treat URLs on your site.
This is important to mitigate the requests your site receives. Setting all your URLs to be crawling can overload your site with too many requests, making your site less efficient in fulfilling each one.
Problems visitors could experience on your site include slow loading times, request timeout, and others.
You also want bots to control which pages to crawl for SEO purposes, if at all. Doing so lets you free up your crawl budget and index your essential pages much faster.
Not all websites will have a robots.txt file, so you’ll have to create it manually first from your web host or FTP client.
Once created, you can edit the file to your specifications.
Let’s say you want to disallow bots from crawling your category and tag pages. You must enter the following on your robots.txt file:
User-agent: *
Disallow: /category/*.xml$
Disallow: /tag/*.xml$
Whereas:
- User-agent – Indicates crawl bots that you want to include in this command. “*” denotes all crawl bots. If you’re going to single out a bot for this command, enter its correct name, ex., Googlebot, MSNbot, Discobot, etc.
- Disallow – Specifies which URLs and folders you want to prevent the bot from crawling.
If you don’t know how to build your robots.txt, create one using a free robots.txt generator like the one at Small SEO Tools ,
From here, determine the URLs and directories you want the bots to crawl or ignore.
Note: Don’t edit the robots.txt file if you’re unsure of what you’re doing. A mistake in the file could cause SEO issues with your site, such as not crawling pages in folders you want search engine bots to crawl.
Instead of uploading the file manually, you can use a plugin like Better Robots.txt to create a virtual version of the file that you can edit from the dashboard.
For the plugin to work and avoid conflict, you must put the robots.txt in your directory.
Fix C – Contact Your Web Server
5xx errors are mostly web server related.
Typically, these errors happen when the web host is currently on its downtime. It should recover your website within a few minutes at the longest.
But if the error persists, contact your hosting provider. They should fix the problem for you or provide you with steps on how to handle it on your end.
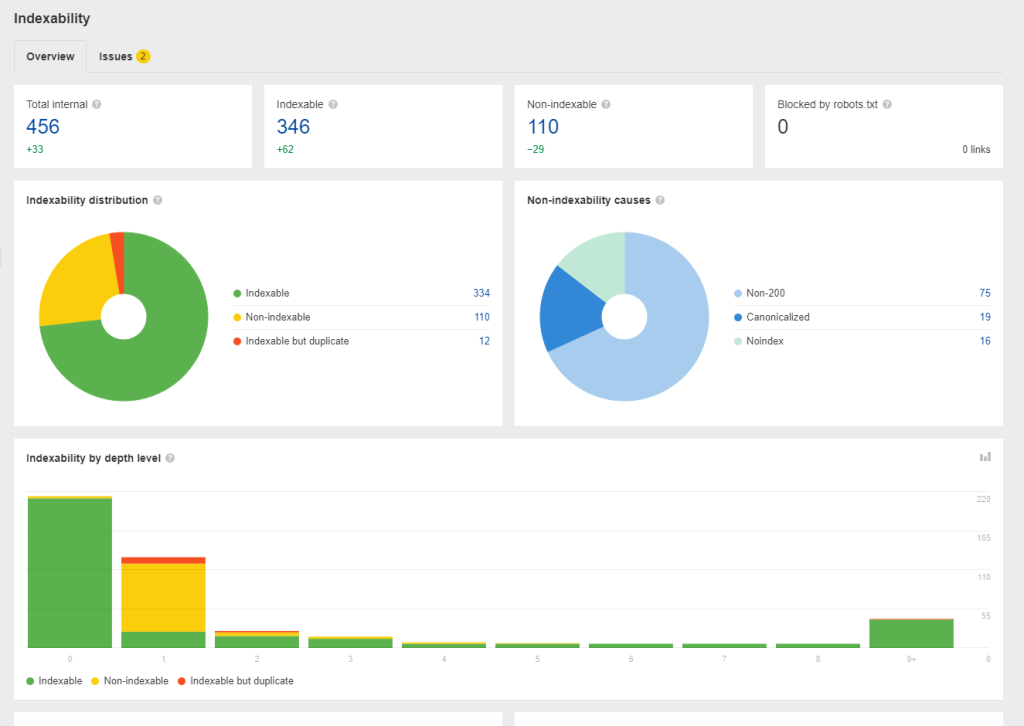
Issue # 2 – Indexation Problems
Just because search spiders can crawl your web pages doesn’t mean they will index them on SERPs.
In this case, you must give a reason for Google and other search engines to want to rank your page on top of search results .
But they also can’t index your pages even if they want to due to indexing mistakes that flew over your head.
Regardless, if search engines haven’t indexed your web pages yet (or deindexed them), below are the main reasons that you’ll find in your technical SEO site audit:
Fix #1 – Analyse for On-Page SEO Issues
So, your pages are good enough for Google to crawl. But are they great enough to be indexed?
Getting your pages crawled is the easy part. The hard work begins once you start getting them to rank on top of SERPs for your keywords.
This is especially true if you’re in a competitive niche where all websites in this space are
This section is an SEO basics checklist of on-page SEO practices you must observe to increase your indexed pages’ chances of moving up the ranks.
The stuff covered here isn’t technical, unlike the other variables discussed in this post. But it’s worth protecting since you want to get the most out of your site page:
- Are you optimising your pages for the correct queries from your keyword research? Finding long-tail keywords with low competition and relatively high search volume to rank for your brand-new site makes generating more organic traffic much easier. It’s that simple—no complicated keyword research checklist necessary!
- Did you mention your keyword on the page’s H1, URL, and title? Considered as the “three kings of SEO,” including your keywords in these page sections increases their likelihood of ranking on top of Google search. For good measure, include your keyword on the page’s meta description. While meta descriptions are no longer ranking factors, unlike before, they can increase your page’s click-through rate on SERPs if your keyword appears there.
- Is your content optimised for readability? Short sentences and paragraphs make your content much easier to scan and process. Also, use bucket brigades to engage readers with your ideas constantly. Finally, featuring visual content like images and videos breaks text’s monotony.
- Does the content cover the topic in-depth? Google isn’t kind to thin content or those that don’t provide value to users. To be clear, thin content doesn’t always mean fewer words. Short content can be as valuable as long-form if it addresses the keyword’s search intent.
Regarding keyword research, Ahrefs will help you determine the best low-hanging fruit keywords to target for your content.
Enter your site’s topic to extract hundreds of keyword ideas and suggestions to optimise your website.
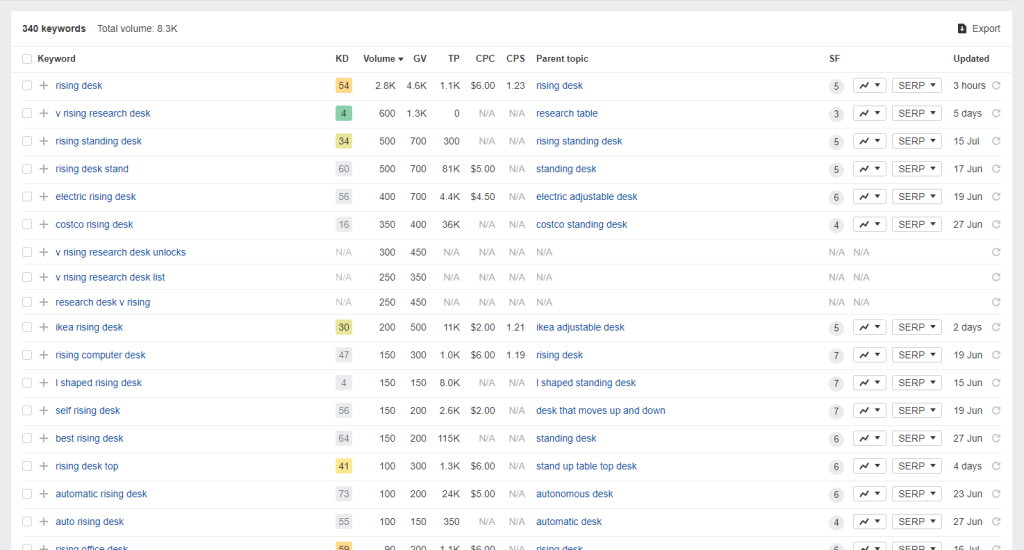
To help you find the best keywords from the list, filter the results to show keywords with the lowest keyword difficulty (KD).

Striking the balance between low KD and high search volume enables you to maximise the results of your SEO and generate more traffic as a result.
As for writing the content, use Surfer SEO’s Content Editor.
Enter the keywords you want to optimise for your page. The tool then will provide you with all the information you’ll need to write content similar to or better than the ones ranking for each search term.
Surfer SEO shows you the number of words, images, and terms to include in your piece to make the content topically relevant to your keywords.
By scoring at least 70 based on structure, terms, and others, you can expect the content to rank on top of SERPs even without link building. This is especially true if you’re targeting the right keywords based on your research using Ahrefs.
Fix #2 – Create XML Sitemap
An XML sitemap is another file in your site directory containing all your crawlable and indexable web pages.
A sitemap provides search engine bots with an easy way to analyse and rank on search results. However, this process may cause bots to miss out on pages on your sites without internal links pointing to them (more on this later).
Instead of detecting all the pages on your site using internal links from your homepage, bots can simply check your sitemap and find all the pages they must crawl and index.
To create a sitemap for your website, use a WordPress SEO plugin like Yoast SEO . It will automatically generate a sitemap for you.
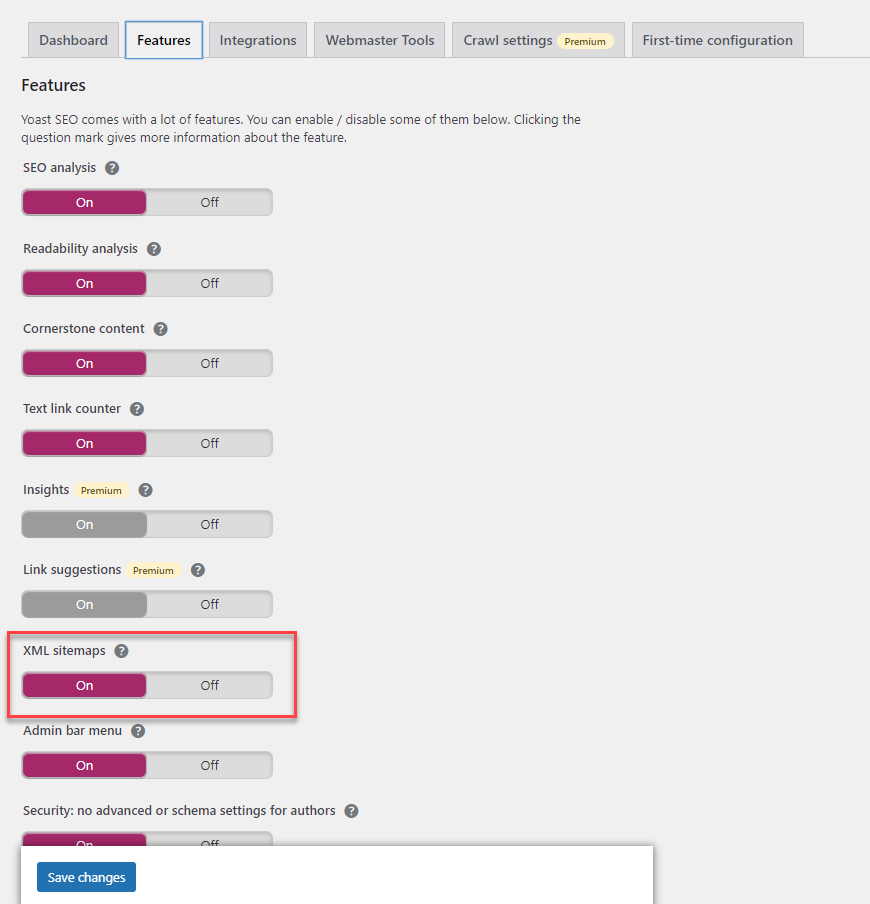
Also, choose which pages and folders you want to exclude from the sitemap, so major search engines don’t have to index them.
After creating a sitemap using the plugin, copy its URL and submit it to Google Search Console. This will help Googlebot efficiently index the latest posts published on your site.
Fix #3 – Eliminate Orphaned Pages
Orphaned pages refer to site pages that don’t have internal links pointing to them.
As mentioned, search engines determine which pages to crawl and index your site with internal linking. If a web page doesn’t have internal links, crawl bots won’t be able to see them in the first place.
Even if the page appears in the sitemap, having a contextual backlink in the content pointing to the page passes link juice from one page to another.
Doing so could potentially increase the search rankings of these pages for your target keywords!
To add inbound links to orphaned pages, determine which among your pages don’t have internal links pointing to them.
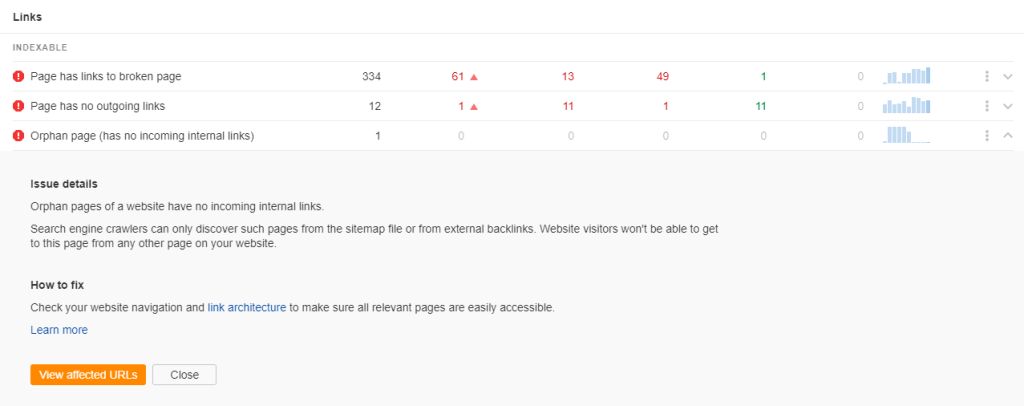
From here, you must add the backlinks to these pages from relevant pages on your site.
For small websites, solving orphaned pages shouldn’t take much of your time. But bigger sites with hundreds and thousands of pages could take weeks—if not months—to eliminate orphaned pages.
Luckily, a plugin like Link Whisper helps you can create inbound links to these pages with a few clicks of a button.
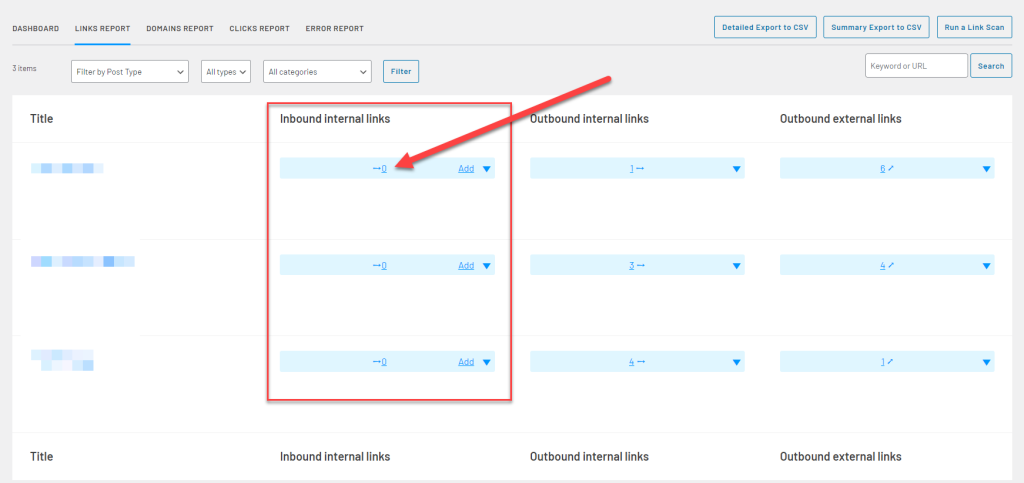
Choose which pages you want your page to be linked then click on the Add links button at the bottom to complete the process. It’s that easy!
You can also edit the link’s anchor text on the fly to pass more link equity to your site and make your link more contextually relevant in the content.
Fix #4 – Fix Broken Links
Broken links are those that point to a 4xx or 5xx error.
These errors appear if the link’s URL changes or no longer exists. This applies to internal and external links.
The goal of links on your site (especially internal links) is to circulate link juice across all your pages, resulting in increased authority and higher search rankings.
But internal broken links waste your link equity and stop it from flowing throughout your web pages. So, the more broken links your site has, the lower your search rankings will be.
So, you must fix broken links by linking to the correct URL or an alternative resource of the previous link.
Your audit tool should help you figure out which links on your site are broken and need fixing.
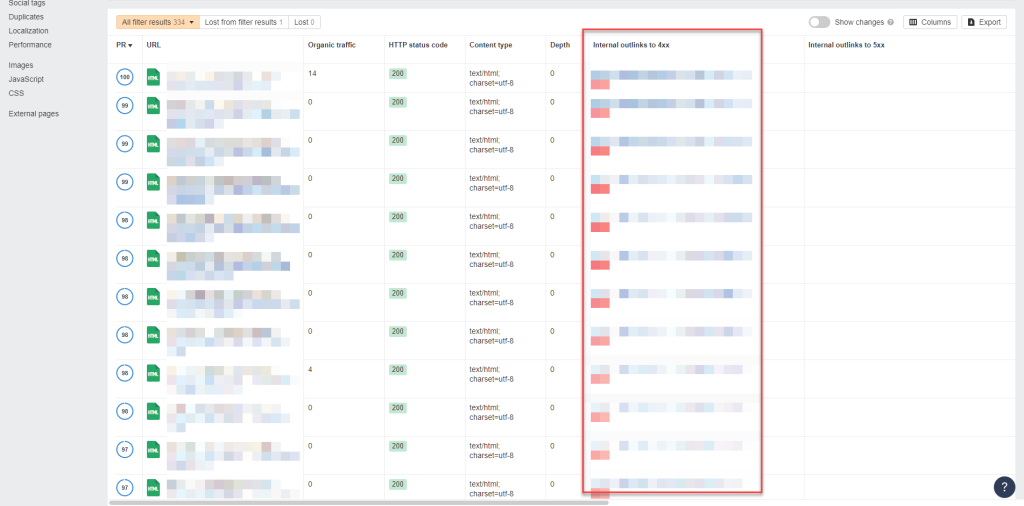
Using Link Whisper, you can also see the broken links on your site and which pages you can find.
Then remove the links or replace them with internal links or links to better pages on other sites.
But you can manually remove and replace these links yourself if there aren’t many broken links.
Fix #5 – Check for Duplicate Content
Duplicate content is the exact content appearing multiple times online.
We will talk about duplicate content that is found within your website, which relates more to technical SEO.
Each duplicate content that your audit report will show has unique URLs.
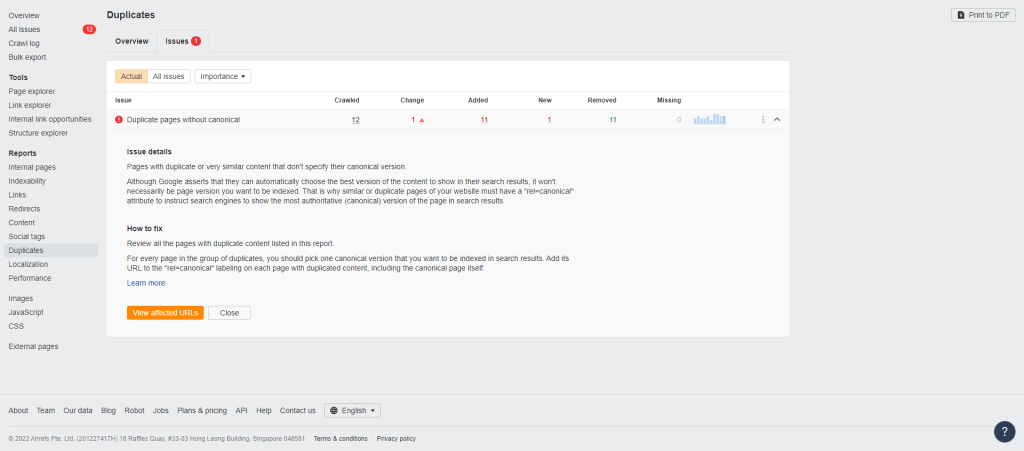
This usually happens if you create parameters for your URL to track the number of clicks in your marketing campaigns.
Session IDs or unique numbers assigned to users describing their activity on your website are also culprits of duplicate content.
In either case, search engines will have difficulty determining which duplicate content variation they should rank over the others.
This leads to search spiders ranking the incorrect version on SERPs, or they could end up not indexing any of the pages, leading to decreased organic traffic!
The fastest fix this issue is by using the rel=”canonical” attribute.
By appending this link attribute to the duplicate pages, you inform search spiders not to index them on SERPs and instead rank the real version.
Most SEO plugins allow you the option to include a self-referencing canonical URL.
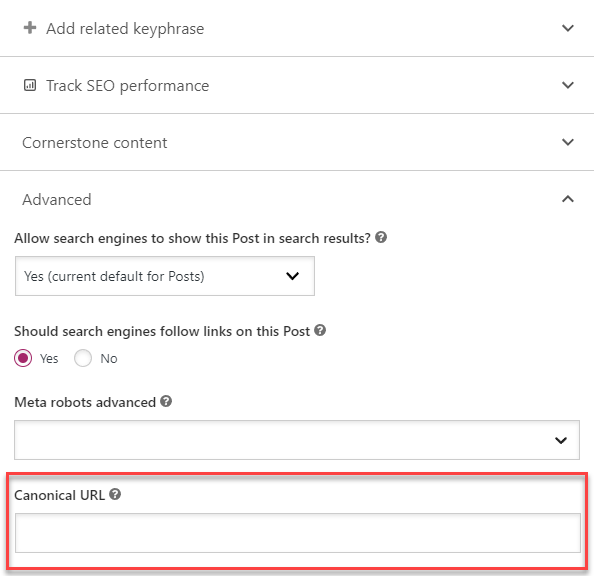
This way, just in case parameters or session IDs are added to the page’s URL, search spiders will still rank the canonical URL of the page and prevent further confusion.
The rel=”canonical” attribute is best used for duplicate content issues concerning URL parameters and session IDs.
It’s possible to have duplicate pages on a category level, an issue common among e-commerce sites.
For example, you have identical content in unique pages such as the ones below:
- example.com/shoes/women/heels
- example.com/apparel/women/heels
- example.com/summer-sale/women-heels
The third page is a temporary landing page used to push sales for the season. You don’t want to necessarily rank for this page since you’ll disable it once the deal ends.
In this case, set rel=”canonical” from the third to the first page, so all its authority goes back to the first page, which contains the same products.
The first and second pages are exact copies but with different URLs. This happens if you create multiple categories that apply to the same products in your inventory.
To fix this issue, use the 301 redirects to the version that provides the best rankings and experience. Then remove the duplicate pages to prevent search engines from picking them up again.
If deleting the URLs is impossible, set them to nofollow and noindex instead.
Fix #6 – Strive for a Flat Site Structure
Site structure pertains to how web pages are organised according to silos or clusters.
You want to group related pages by interlinking them with each other. Doing so enables you to build topic clusters in your website, covering subtopics about your niche.
And by making your website topically relevant to a specific niche, you can increase its organic rankings.
But site structure or architecture is more than just interlinking pages together to form silos.
It also has to do with click depth or the number of clicks users and search spiders take to reach your web pages from the homepage.
Ideally, all your pages should take a maximum of four clicks away from your homepage.
If search engine bots take more than four clicks from the homepage to arrive at a page, they won’t be able to crawl and index it properly.
Screaming Frog SEO Spider allows you to visualise your site architecture so you can see pages that are far away from your homepage.
From here, you can determine ways on how you can “flatten” your site architecture.
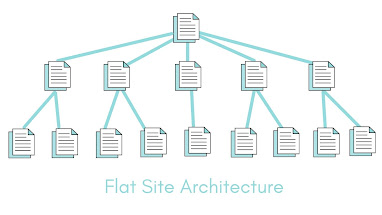
Below are ideas to help you get started:
- Link the most important pages on your homepage. This means you must create a custom homepage to include these links if your homepage only features your latest blog posts.
- Interlink pages five clicks away from your homepage from pages that are two or third clicks away from your homepage.
- Create topic clusters using pillar content with linking supporting articles. Then link to the pillar content from the homepage.
- Features categories or tags on your site menu or sidebar.
The suggestions above may not apply to bigger sites with thousands of pages. They have no choice but to implement a deep site architecture with pages requiring multiple clicks from the homepage to reach.
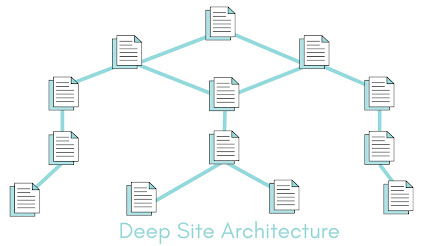
However, this isn’t necessarily a bad thing—the most important factor to consider with site architecture is to make finding the most vital pages on your website easier for users and search spiders .
Search engine spiders should consider your website size when crawling and indexing it.
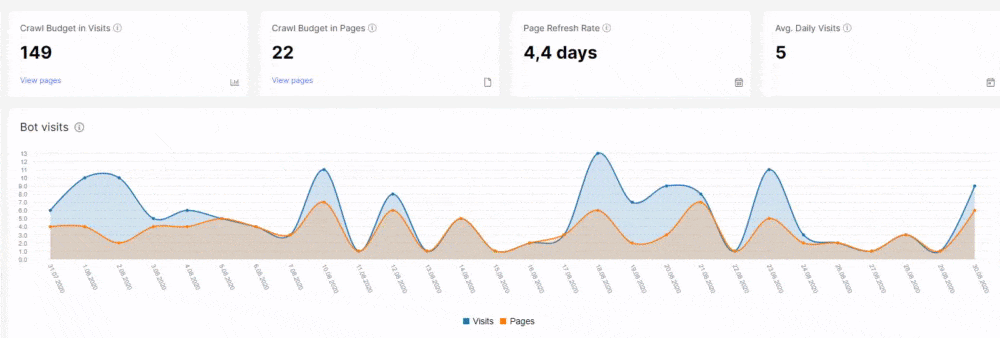
Log File Analysis Issues
So far, we’ve discussed why your website has technical SEO issues from an audit report. The tool uses its crawl bot to simulate how search spiders view your website based on various SEO factors.
However, an audit tool’s crawl bot may not detect factors that a search engine bot does.
By accessing your log file, however, we finally see how search engine bots behaviour towards your site.
It shows client information about who accessed your website, whether a bot or an actual user. By analysing the data, you can better decide how to approach your site’s technical SEO problems.
To download a copy of your site’s log file, you must reach out to your web server for the directions. Each provider has its way of saving and giving you access to your log file, so it’s best to start from there.
Once you have your log file, this is what it looks like:
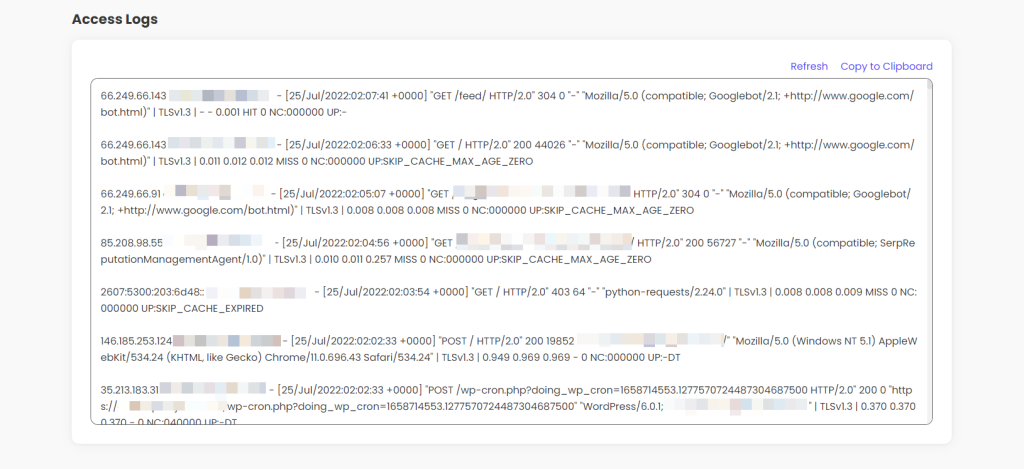
Each line contains some of the following information:
- Client IP
- Time when the client made the request
- Requested URL
- Status code
- User agent (bot or user)
Identifying these from each line would be difficult, especially if your site received thousands of client requests.
To help make things much easier, use a log file analyser tool to organise the information for you.
Upload the log file from your chosen tool, and it will deliver you client information similar to how SEMrush does it:
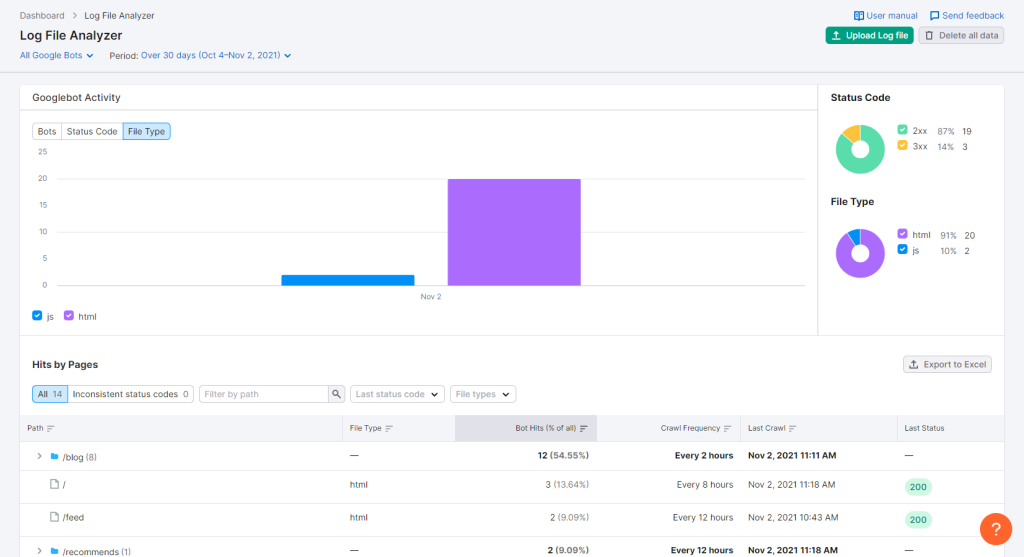
The log file should show you the technical SEO factors discussed earlier, such as the status codes of pages visited by user agents, when they accessed the pages, the file types, and more.
The only difference here is that you’ll see how Googlebot and other search spiders view your website.
There may be discrepancies between the data shown on your log file with the ones on your audit report, which is good.
By verifying the audit report using your site’s log file, you can make informed decisions on dealing with the problems arising from your website.
Page Experience
Google has made efforts through the years to incorporate user experience as a ranking factor.
Updates like Mobilegeddon , favouring websites that passed the Google mobile-friendly test, to site speed becoming a factor in 2018 were just the tip of the iceberg.
Only in the Page Experience update did all factors concerning user interface and experience come crashing on websites like an avalanche.
Websites can now measure this collective ranking factor using the Core Web Vitals (CWV). It’s a score that measures your site for three different variables:
- Largest Contentful Pain (LCP) – How long does it take for your main content to load?
- Cumulative Layout Shift (CLS) – Is your site’s layout shifting up and down when loading due to page elements?
- First Input Delay (FID) – Do page elements interact with users the way they’re intended to, ex., clicking on a button immediately brings you to a different page?
You can make sense of these by getting your CWV score on Google PageSpeed Insights. Enter your URL so the tool can analyse your site for these factors and provide your score.
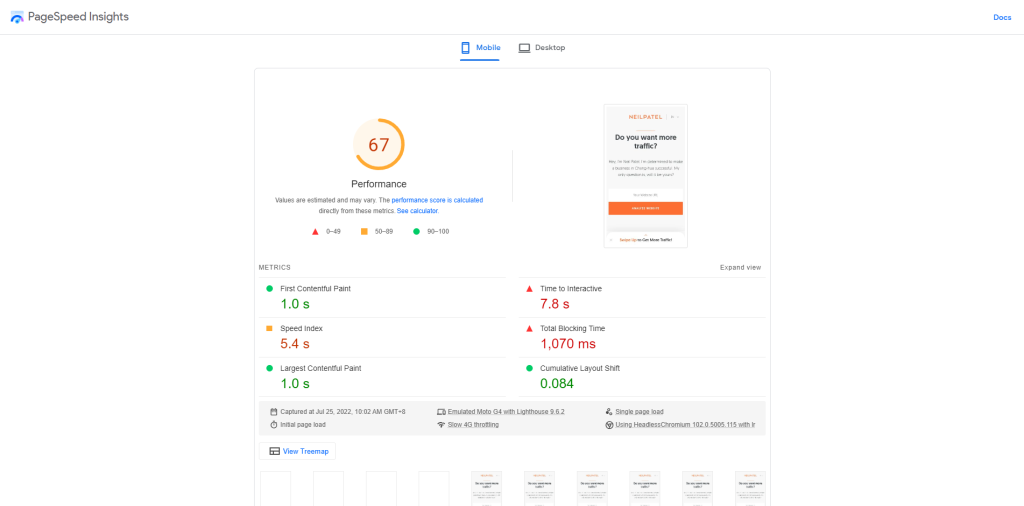
The great thing about PageSpeed Insights is it shows you why you received such a score by scrolling down and seeing the Suggestions section:
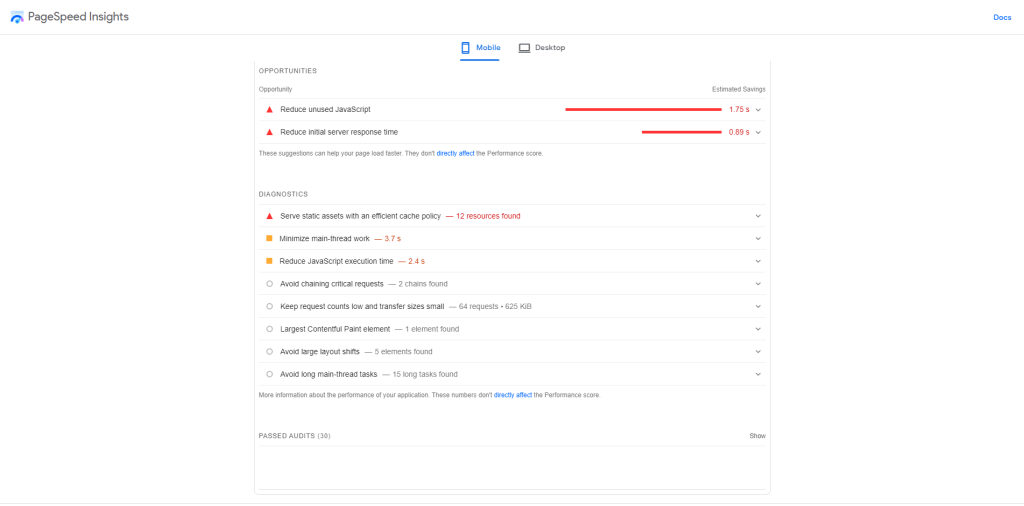
Some of the fixes in these suggestions can be complicated, especially if you’re not web developers. However, you can quickly resolve most of them by following the fixes below:
Fix #1 – Change Hosting
Your web host deals with users and bots requesting for your site.
Depending on the web host’s server quality and available resources, you can either fulfil their requests at blazing-fast speeds or a snail’s pace.
And since site speed factors heavily into your Core Web Vitals score, you must host your website on servers that efficiently deliver your site to user agents.
A quick query on Google search bar would show you the fastest hosting providers available.
However, you’ll probably see the same web host providers on top of these lists for the wrong reason— they have a high-paying affiliate commission.
And even if these hosting providers are the best, it’s hard to trust these round-up posts for the same reason above. Their affiliation with these hosting platforms taints their otherwise honest review of each.
Still, you have to decide which web host to settle with.
I recommend reading Authority Hacker and Matt Diggity’ s posts regarding which web hosting providers to choose from.
They are some of the most trusted voices in internet marketing, so you can guarantee to receive the best advice on which web host to use.
Fix #2 – Use Caching Plugin
Caching refers to storing the files of web pages users visited in their local drive.
So, when they visit the same page again, it will simply load the files saved locally instead of fetching the files from the server, resulting in a faster loading speed.
For WordPress site owners, a caching plugin is essential in improving overall loading performance and increasing your Core Web Vitals score.
Aside from its site speed features, an excellent caching plugin can do the following:
- Compress GZIP to decrease web page’s file sizes and load them faster on browsers.
- Minify and combine CSS and JS files to reduce file size further.
- Delay JS loading to improve loading performance and interactivity.
- Lazy-load images and videos so users will only download the files when they need to view them.
- Connect with a content delivery network (CDN) to load your website faster by fetching data from the nearest data center where the visitor is located.
One of the better caching plugins available is WP Rocket . It performs all the things mentioned above at an affordable price.
After installing the plugin, you can set and forget it on your site, as it’ll do the heavy lifting for you.
Fix #3 – Compress Images
Images are a bane in site performance.
Users loading websites that heavily rely on visuals as part of their content, i.e., e-commerce sites, may experience slowdowns due to the images they must load.
There’s only so much that caching tools with lazy-load features can do. If the images are too large, visitors will still have to wait a few seconds to see the photo in all its glory.
Decreasing image file size by compromising on its quality is not an option, either.
You don’t want visitors to see a shoddy image of the product you’re selling because they probably won’t buy it based on first impressions.
However, you CAN decrease an image’s file size and retain its crystal-clear quality using image compression tools.
Plugins like ShortPixel allow you to compress image files as you upload them to your site. This way, you don’t have to manually compress them before uploading.
![]()
More importantly, you can optimise existing images on your site by making their file sizes smaller while keeping their quality intact.
When using these plugins, ensure they work in sync with other plugins on your site. It’s possible that having multiple plugins installed on your site could cause complications with your site’s backend.
Structured Data Markup
One of the ways to make search spiders pick your web pages more easily is to provide more information about each one.
We’re not talking here about the content that loads on the page. We’re referring to structured data markup using Schema.org.
It is saved in a file containing details about the page and how to display it on SERPs.
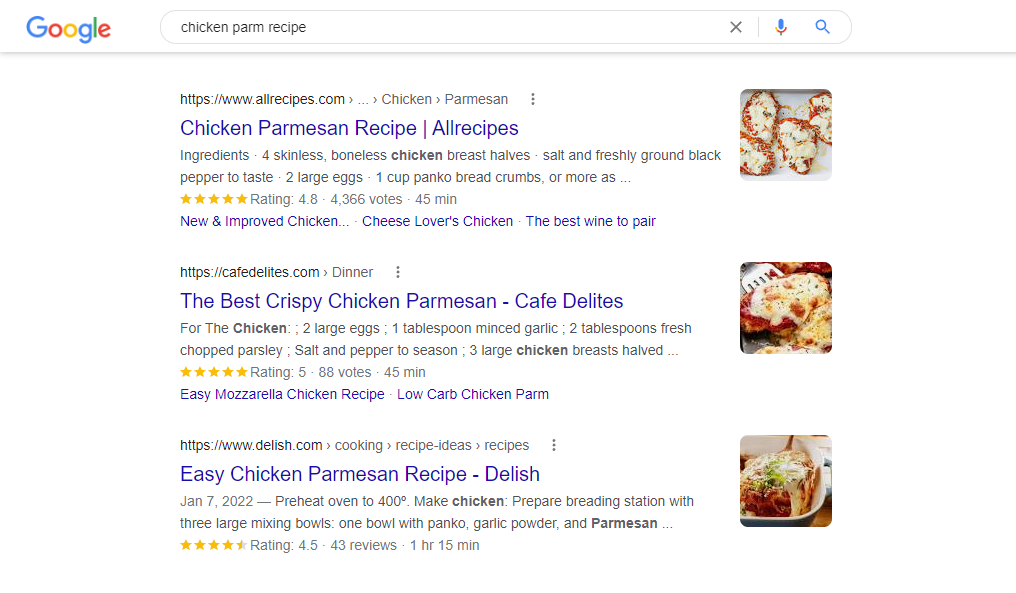
Structured data is prevalent on recipe pages appearing on search results:
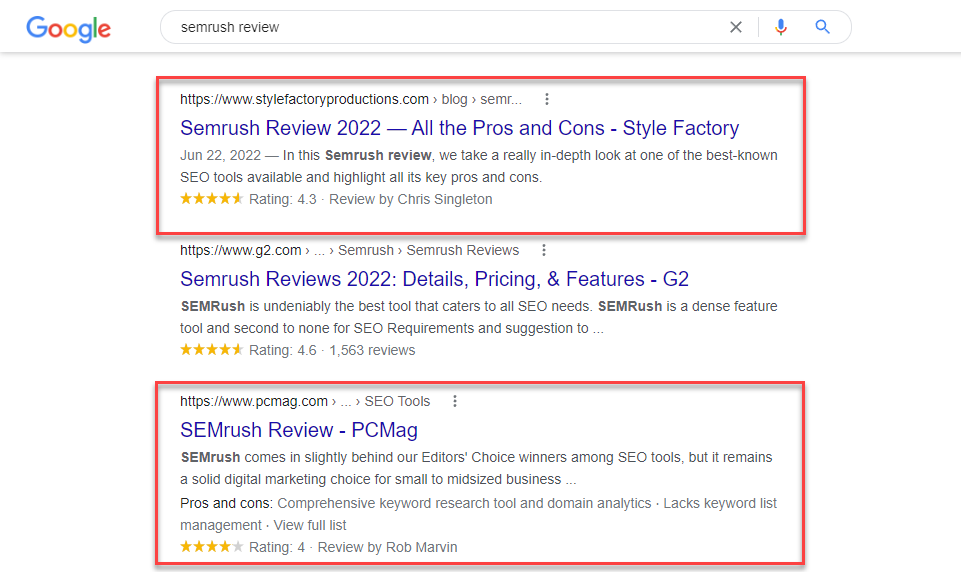
You can also see structured data on product or software review pages as well.
These are just some of the examples of structured data in action. You can implement this markup on the different entities below (among many others):
- Event
- Person
- Organisation
- Place
- Restaurant
Using structure data allows your page to stand out on SERPs by getting more people to click on it over the rest.
This way, you can generate more traffic from your pages even if you don’t rank on top of search results!
Users will visit your review page on SERPs if it contains rich snippets such as star rating, price, and availability. This information helps them make an informed decision about the product in question.
To implement structured data on your site pages, you must follow the style guide indicated on Schema.org .
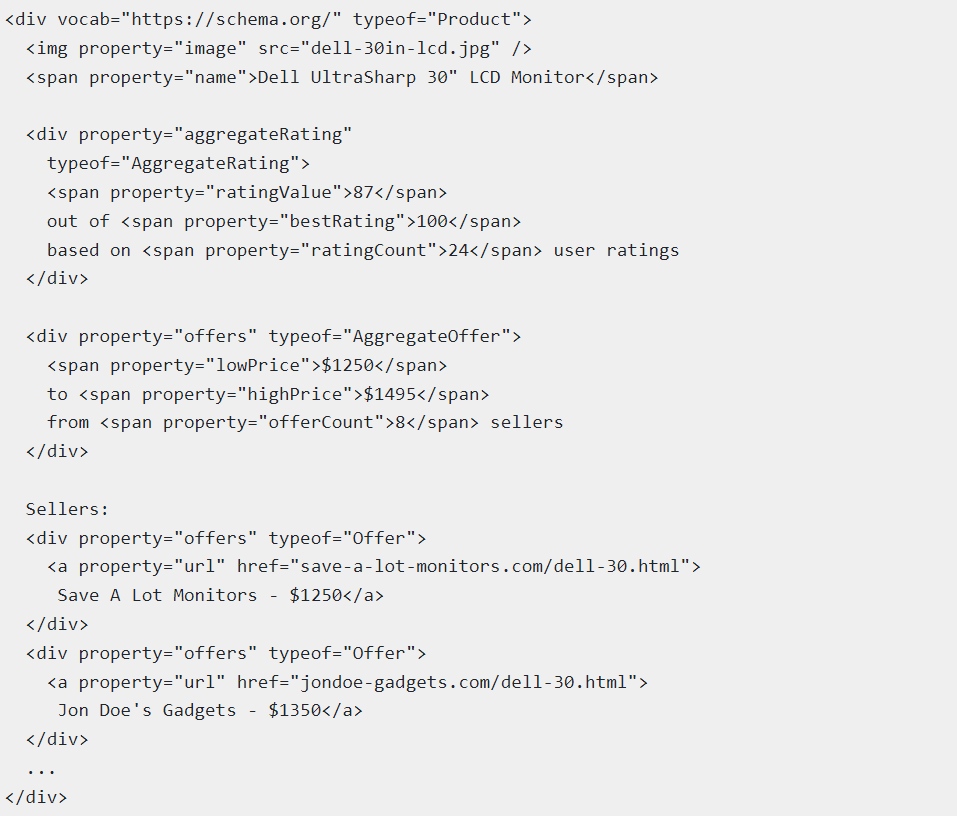
Here’s an example of what a correct structured data markup file looks like using JSON-LD syntax:
If you think you have to enter this manually on each of your pages, think again.
Thankfully, some tools can help you create structured data on pages that require them.
Schema markup isn’t necessary for blog posts and articles since it will display the pages without any rich snippets.
But for the mentioned entities above, you want to create structured data for each and maximise click-through rate (CTR).
To do this, a plugin like WPSchema can help you create the correct structured data for your pages with a few clicks of a button.
This solution is ideal if your site has hundreds of pages where structure data is applicable and could help improve their CTR.
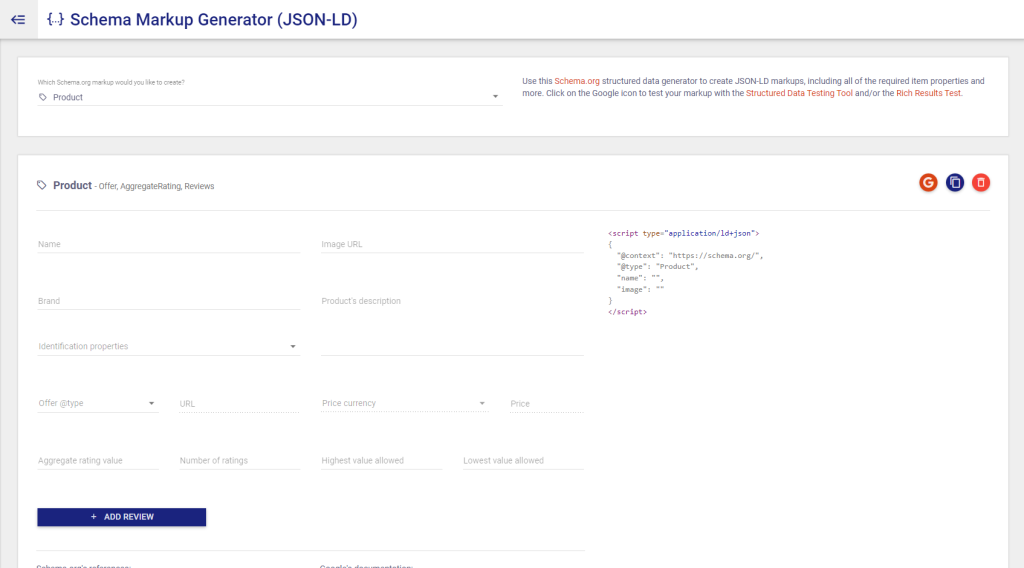
For smaller sites, you can manually create a structure data markup for each using Merkle Schema Markup Generator .
After creating the code, paste it onto the page’s <head> section to show its rich snippets on SERPs.
Conclusion
We have covered everything you need to know about running a technical SEO audit and how to use our checklist.
Hopefully, you will consider this post part of the many technical SEO resources to help supercharge your SEO strategy.
However, a technical SEO audit is just half the battle.
Implementing the relevant fixes on your site using the checklist will only make your site pages much easier to crawl and index.
The next step is to optimise your entire site for other on- and off-page ranking factors. They help your site pages rank even higher on search results.
All Technical SEO Related Posts
Check out the in-depth list of technical seo posts.
- Common Issues During Server Log Analysis

- Google Bot Crawl Budget Optimisation

- Silo Internal Linking

- Technical SEO Checklist
The full list shows the various technical seo strategies for ranking higher in Google SERPs.

About FatRank
FatRank is a UK-based lead generation and ORM agency that delivers high-quality leads, enhances brand reputation online, and shares expert insights on SEO and AI innovation.
Need exclusive leads?
We deliver a consistent flow of high-quality exclusive leads. No fluff. No guesswork.
Get free leads →★★★★★ Excellent